Five Ways to Create an Exceptional Fireplace

We’ve come a long way from the days when the fireplace was an essential and often daily used part of the home. These days we can cook food and keep the house warm without using a fireplace, and more efficiently too (although we can’t argue against how nice it is on a cold winter’s day to curl up in front of a warm fire). No longer necessary for a functioning home, the fireplace has been allowed to take on a new role, one that involves more of a design element than performing crucial functions. A well-designed fireplace can be a real standout in a room and we’ve outlined a few ways below on how to create an exceptional fireplace


Built in Firewood Storage

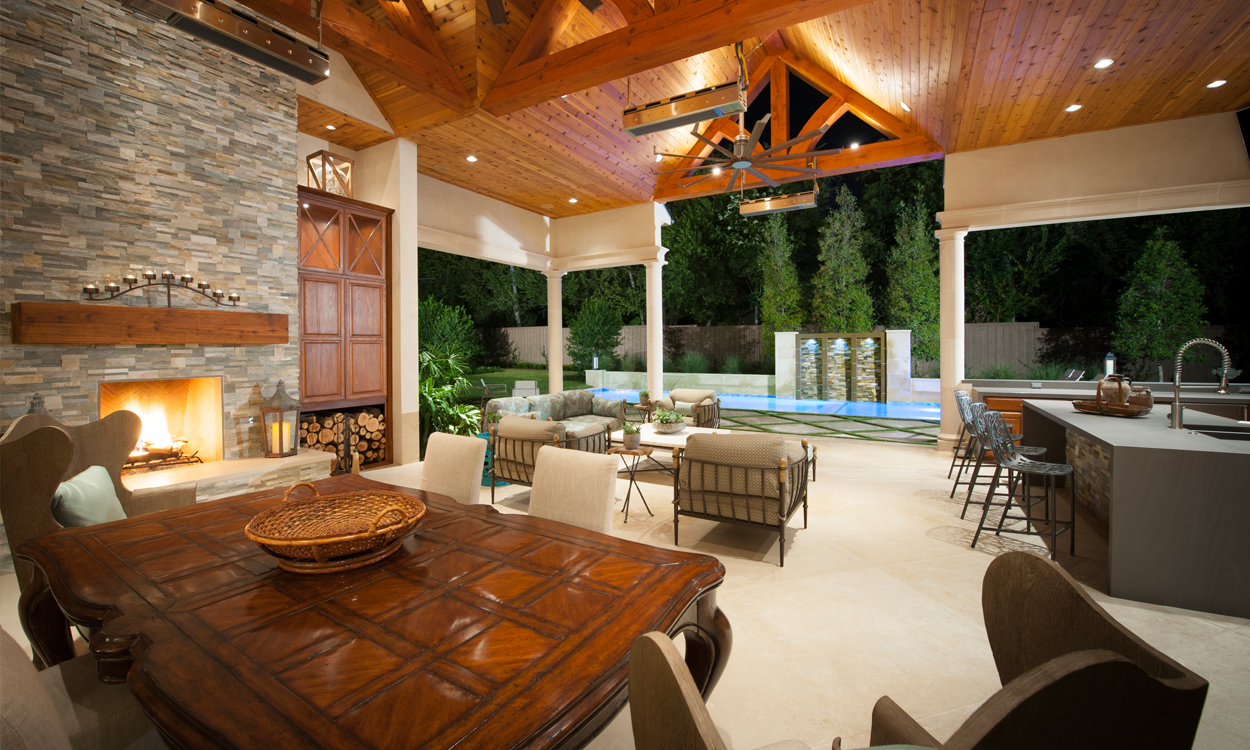
If you plan on using your fireplace for its intended purpose of burning a fire then consider adding a built-in storage cabinet or cubby close to it where firewood can be stored. The convenience of storing firewood so close will make it easier to get a fire started and to keep track of when you need to restock. Or if you’re someone who wishes they used their fireplace more often having the firewood right there and ready to go might be the encouragement you needed. And even if you don’t fall into either of those camps, having some wood stored next to a fireplace can create a homey feel and would be a great design element, especially if you’re a fan of country or rustic style.


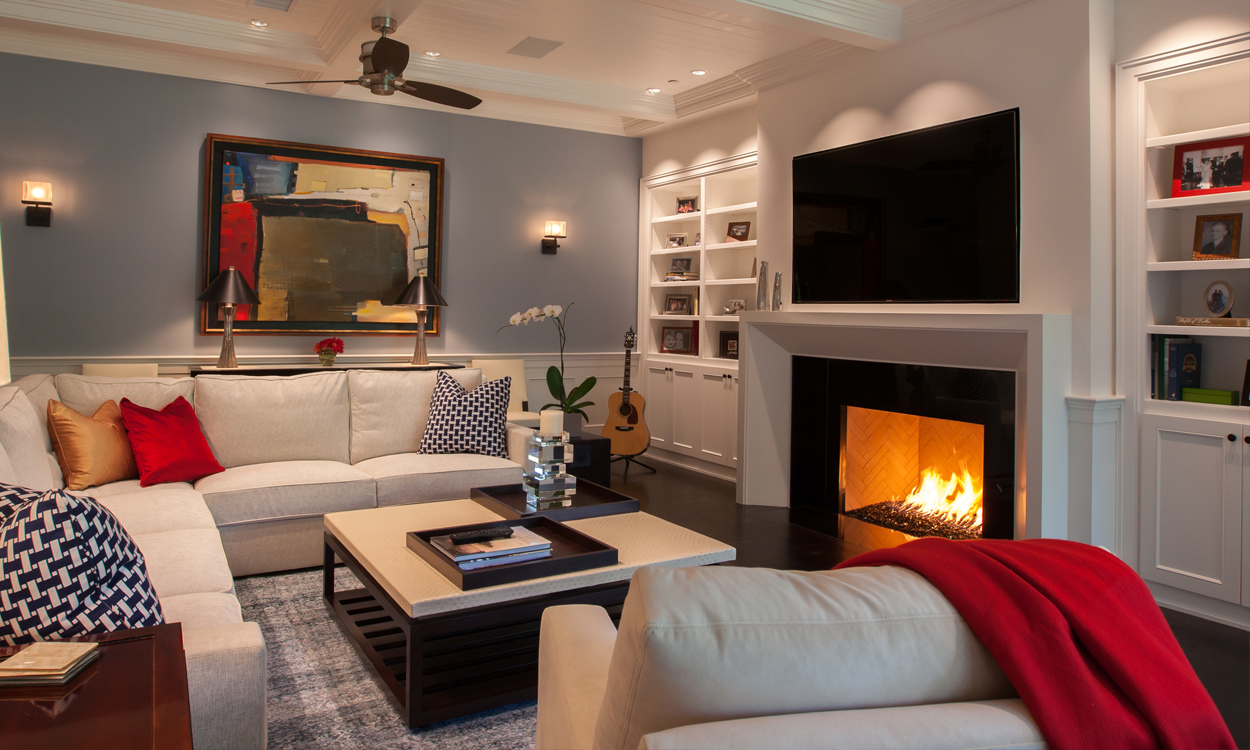
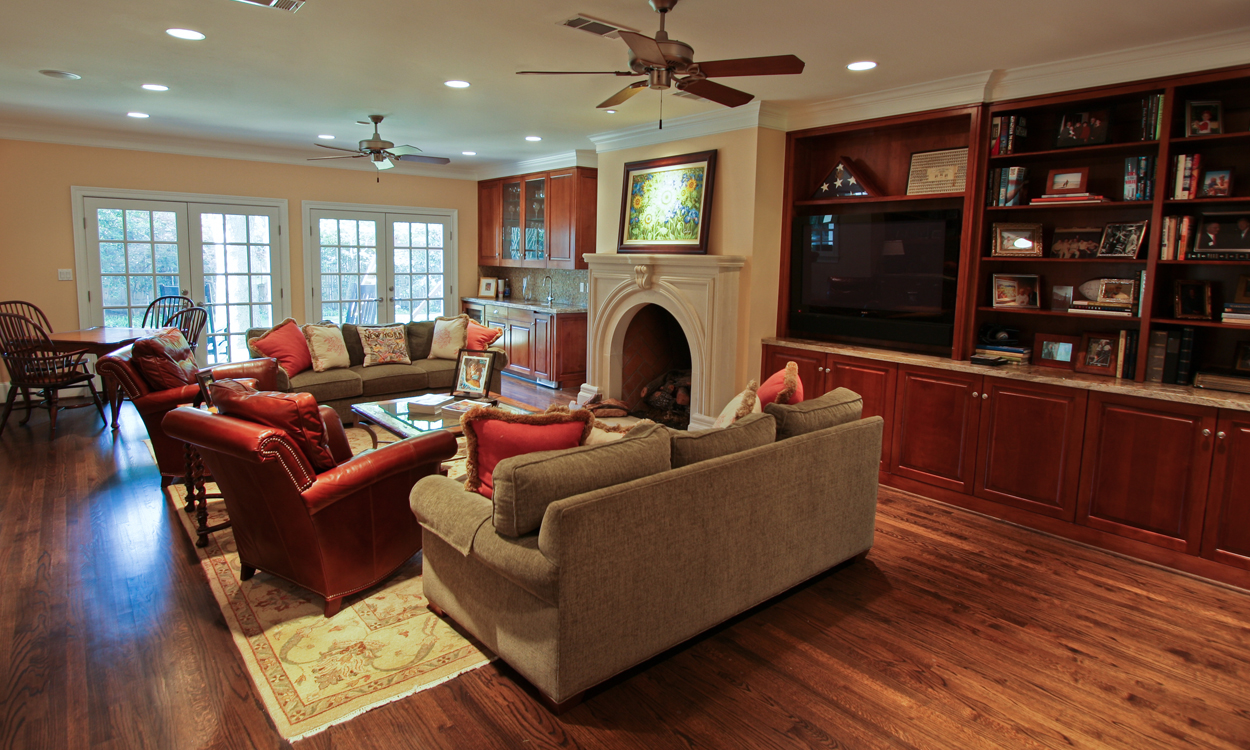
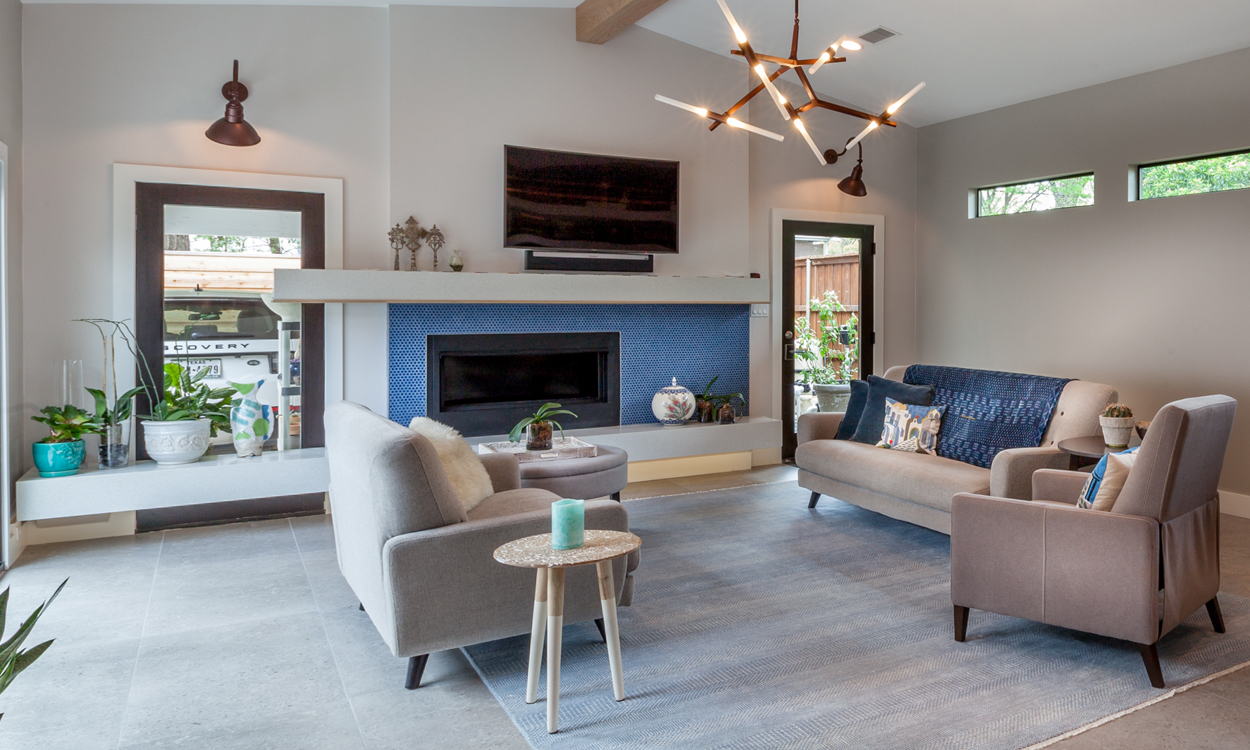
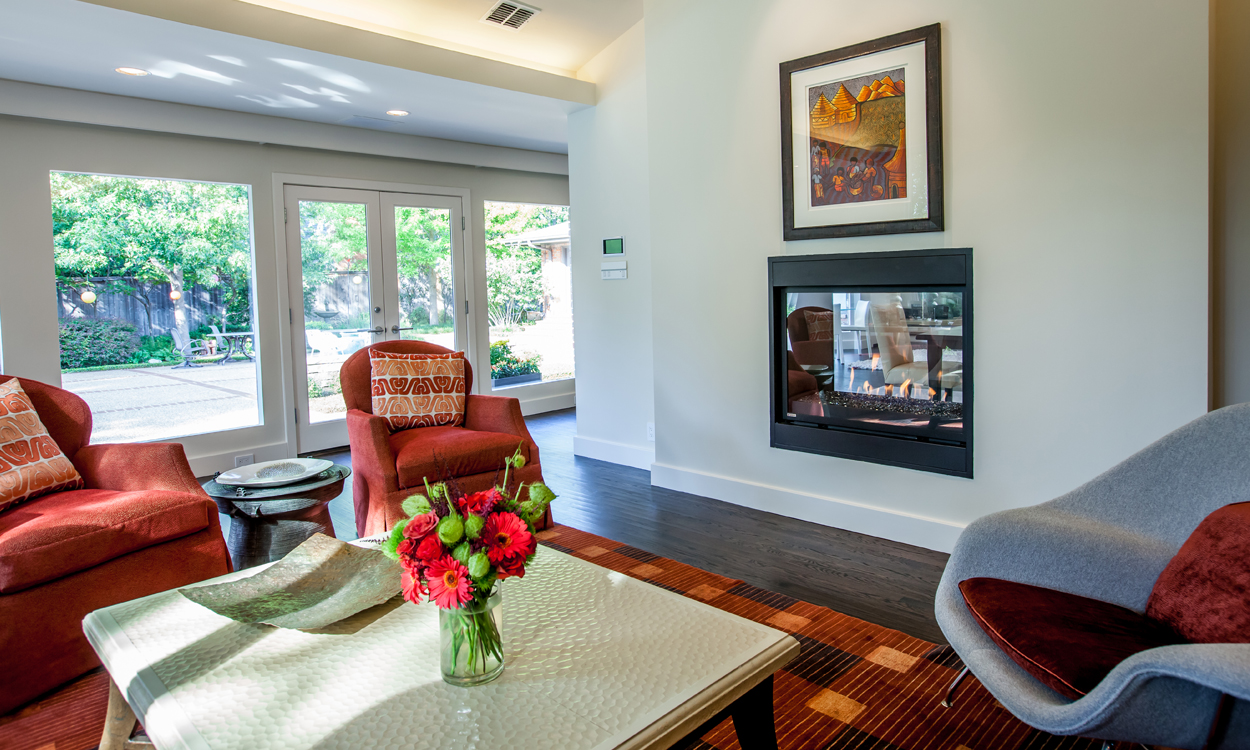
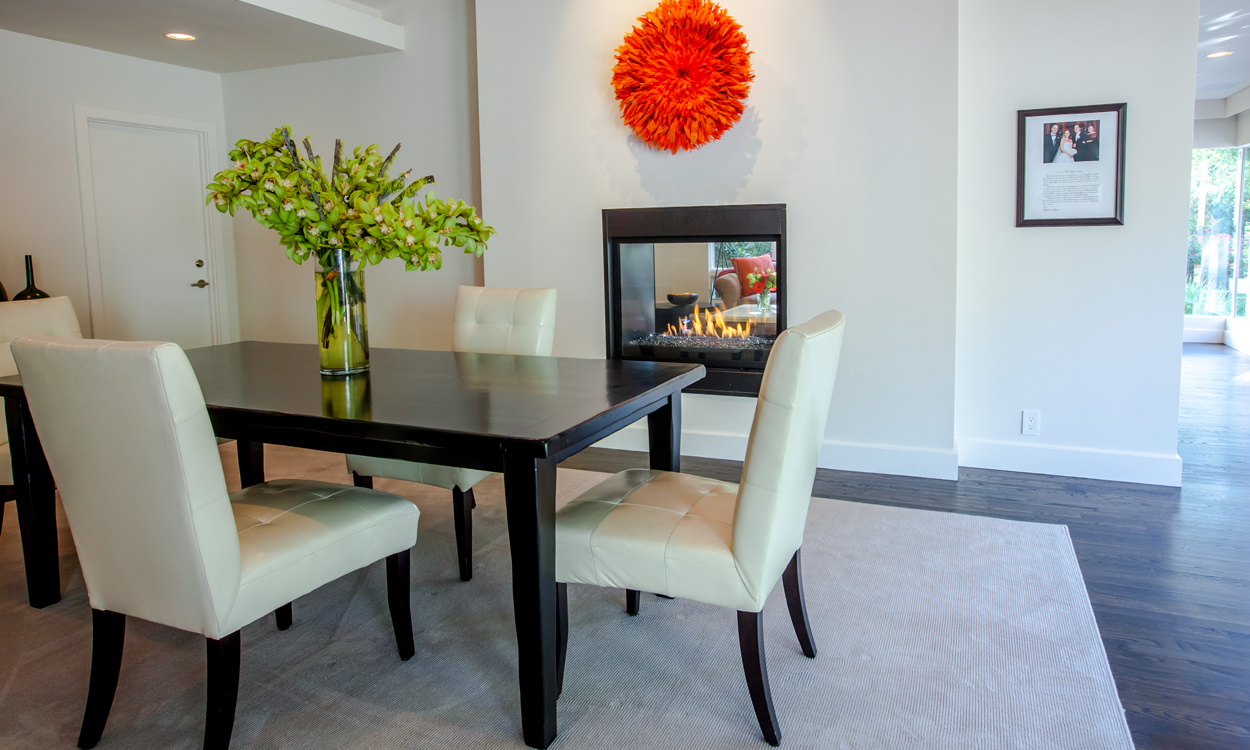
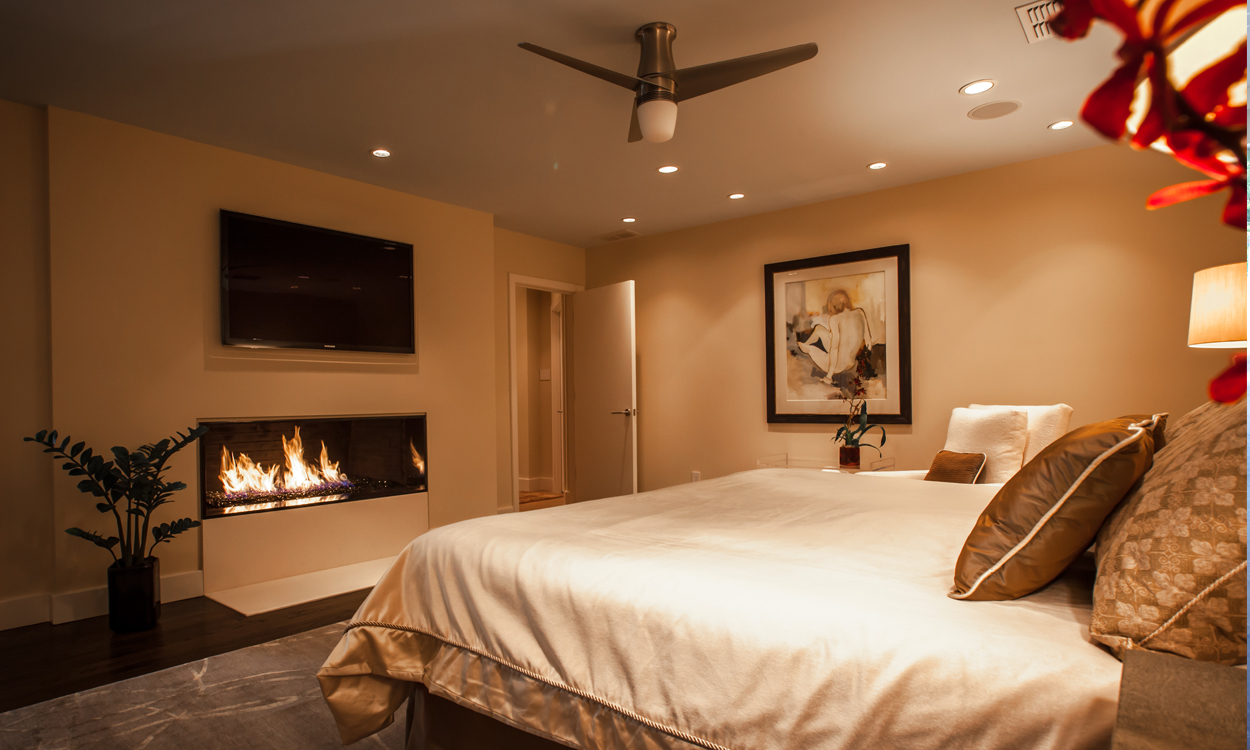
Don’t Ignore the Surrounding Space

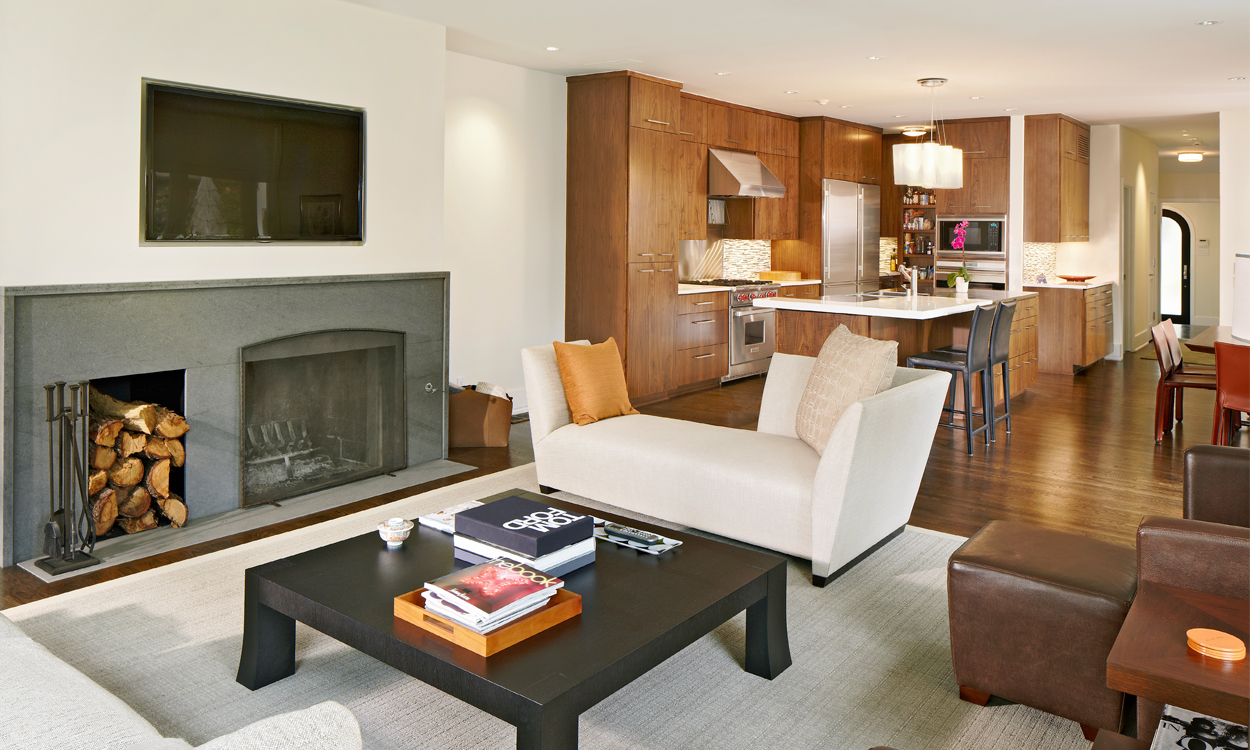
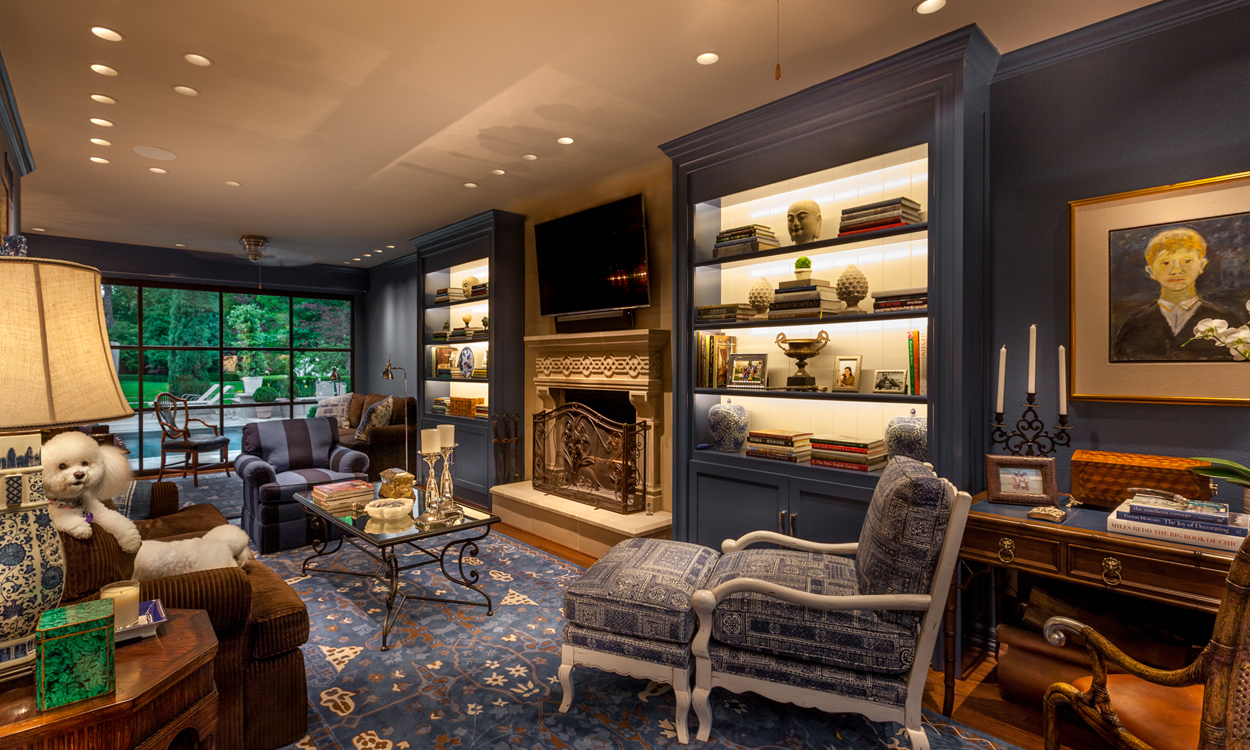
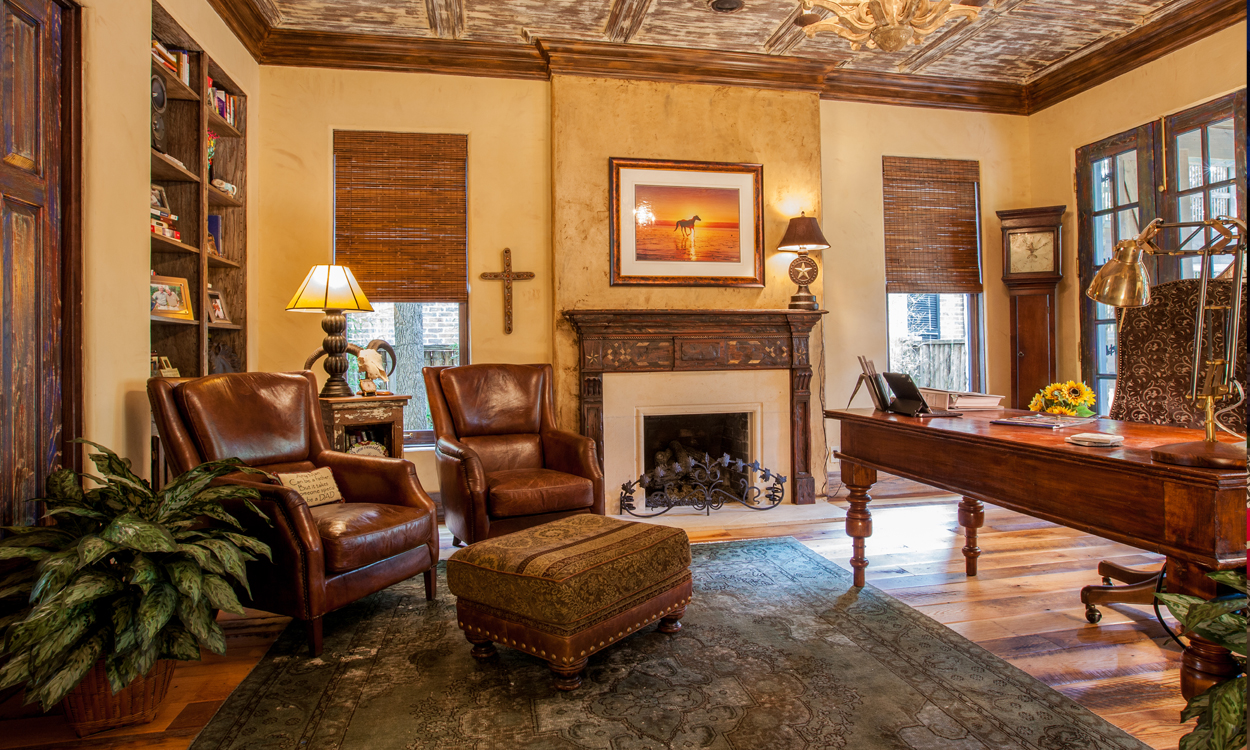
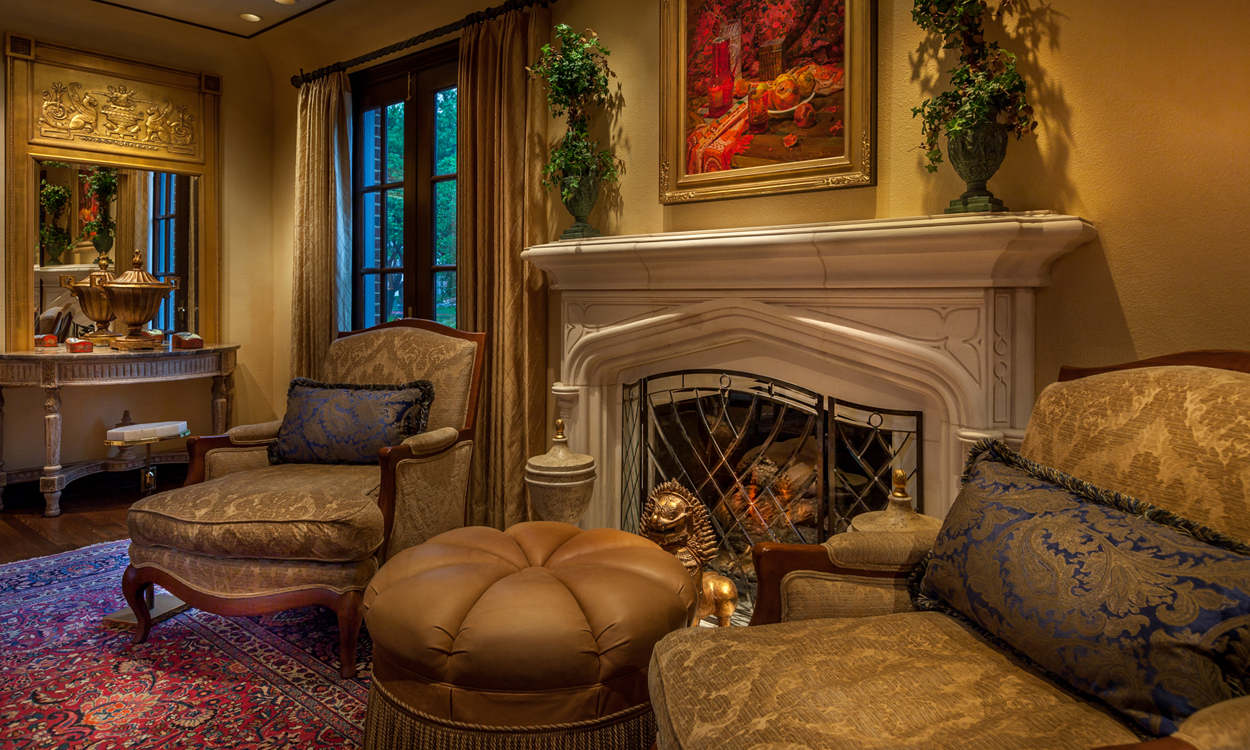
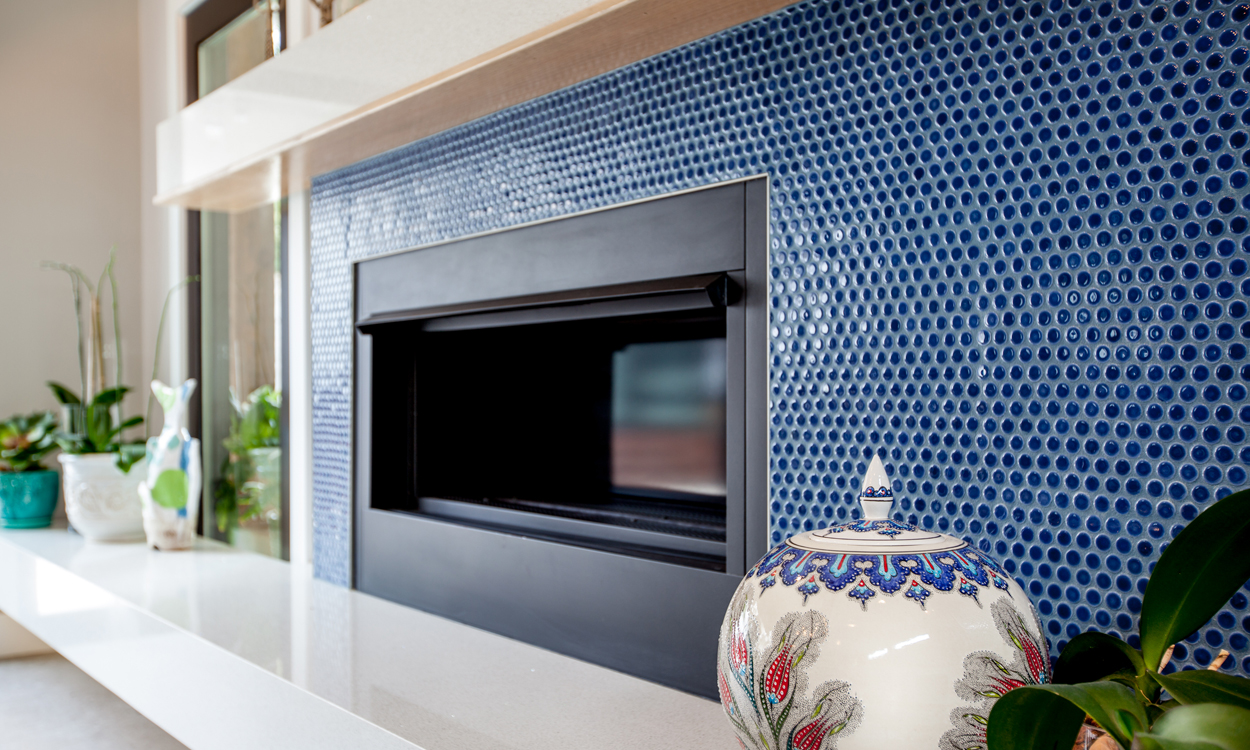
When designing a fireplace it can be easy to get caught in the trap of thinking all the attention should be on the fireplace itself. But the areas immediately around it can be just as important. In many homes the fireplace has quite a bit of wall space surrounding it, be it to the sides or above. Instead of ignoring this space, use it to enhance the design appeal of the fireplace. For the surrounding walls consider built in shelving or cabinets to help frame the fireplace and focus the eye. If there is ample space above the fireplace then consider carrying the material that frames the firebox, be it stone, tile, wood, or any other material, to the ceiling to create a real statement piece.
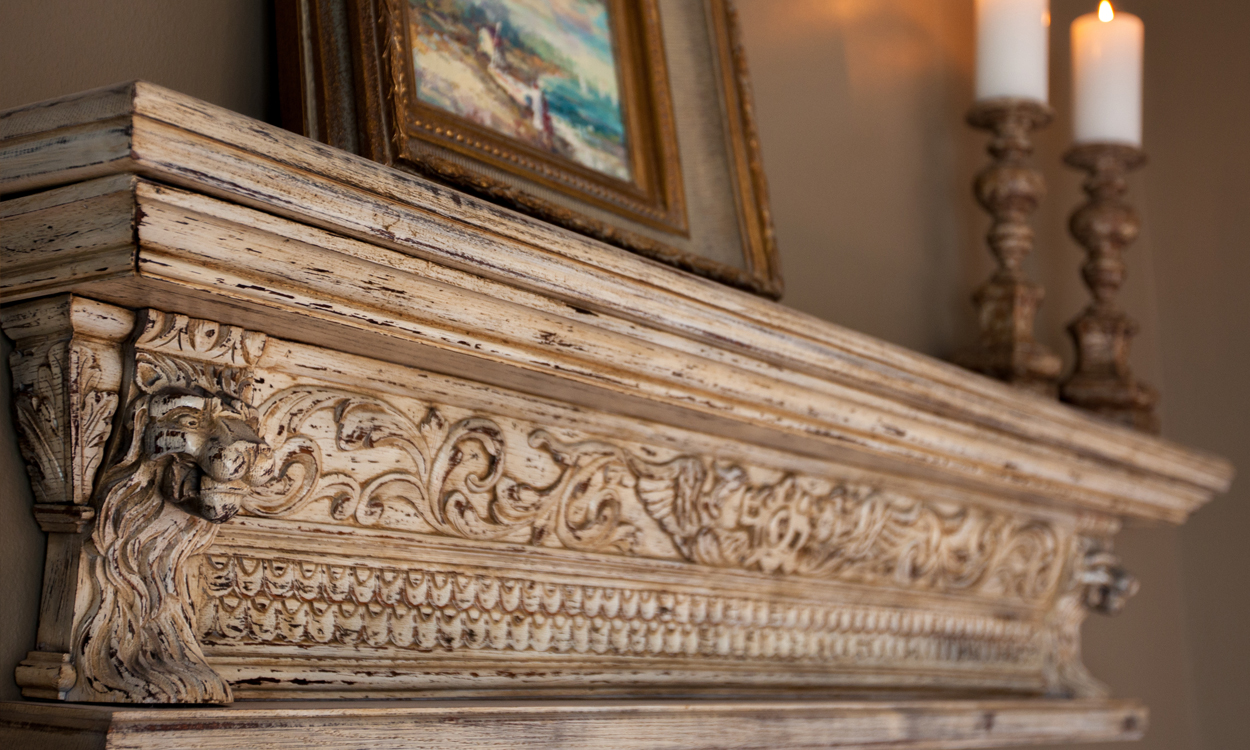
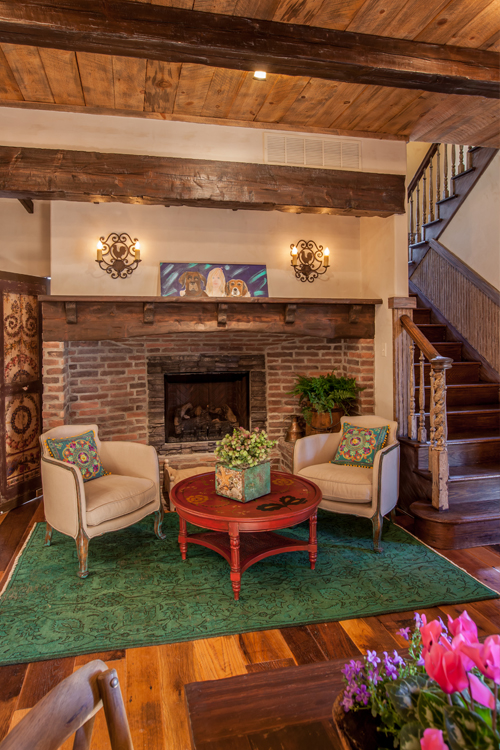
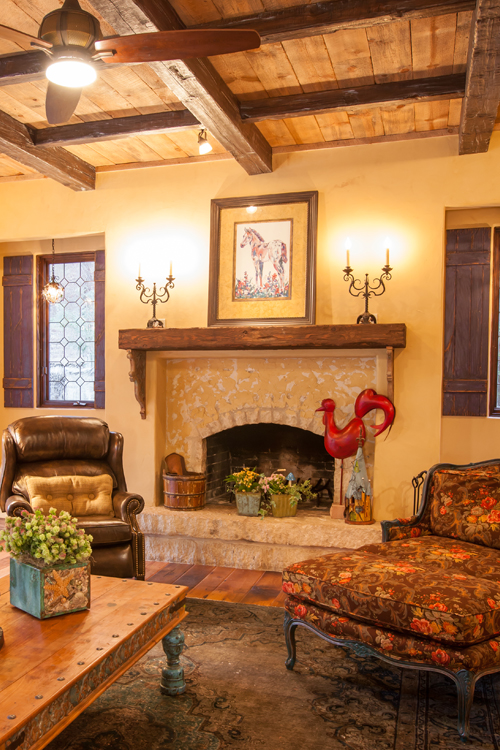
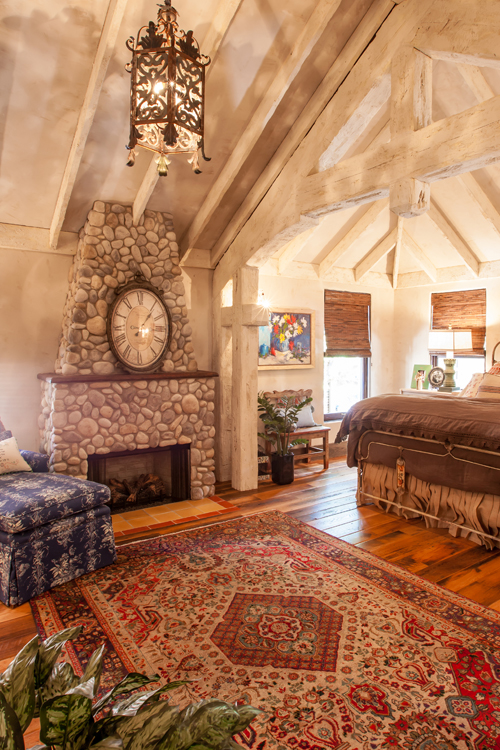
 

Interesting Mantle

Fireplaces have been around since the early 1000’s, but the mantle as we’ve come to know it didn’t appear until the 1800’s. Originally the mantle was designed to be part of a hood meant to catch smoke. These days, the mantle of a fireplace, if there is one, serves primarily as a decorative piece rather than something vital to the fireplace’s function. With this in mind, consider using the mantle as a way to add distinct character. An intricately carved wood mantle would work well within traditional design, a quartz or other stone type countertop surround lends itself well to contemporary and modern design, or try a reclaimed wood beam for a country/rustic design.


Don’t Stick with Tradition

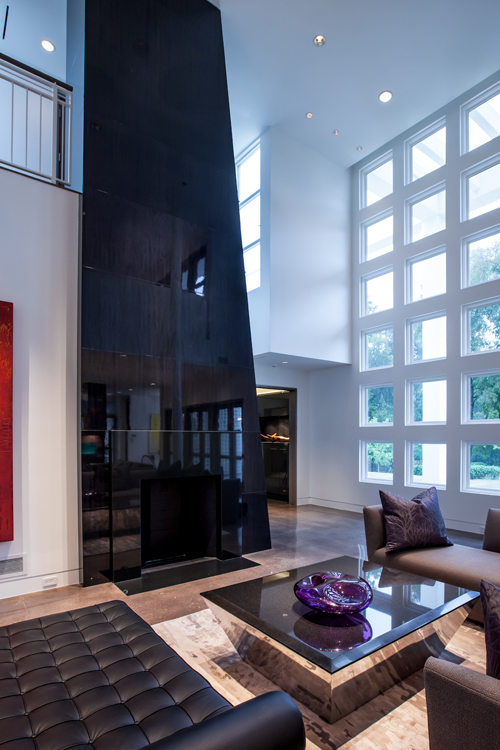
What first comes to mind when you think of a fireplace. For most people we’d bet it’s a rather traditional image: a fire box with a hearth below and mantle above, perhaps surrounded by stone or brick or wood. But with the shift towards design as a main function of the fireplace that traditional image no longer needs to be strictly adhered to. Contemporary and modern design with their affinity for new styles and pushing the boundaries have taken the lead in changing what a fireplace should look like and have brought about things like the absence of a true mantle or hearth, long linear fireplaces that are completely flush with the wall, and double-sided fireplaces that are shared between two rooms. Don’t let tradition limit you. Get creative and think outside the box when designing your fireplace!

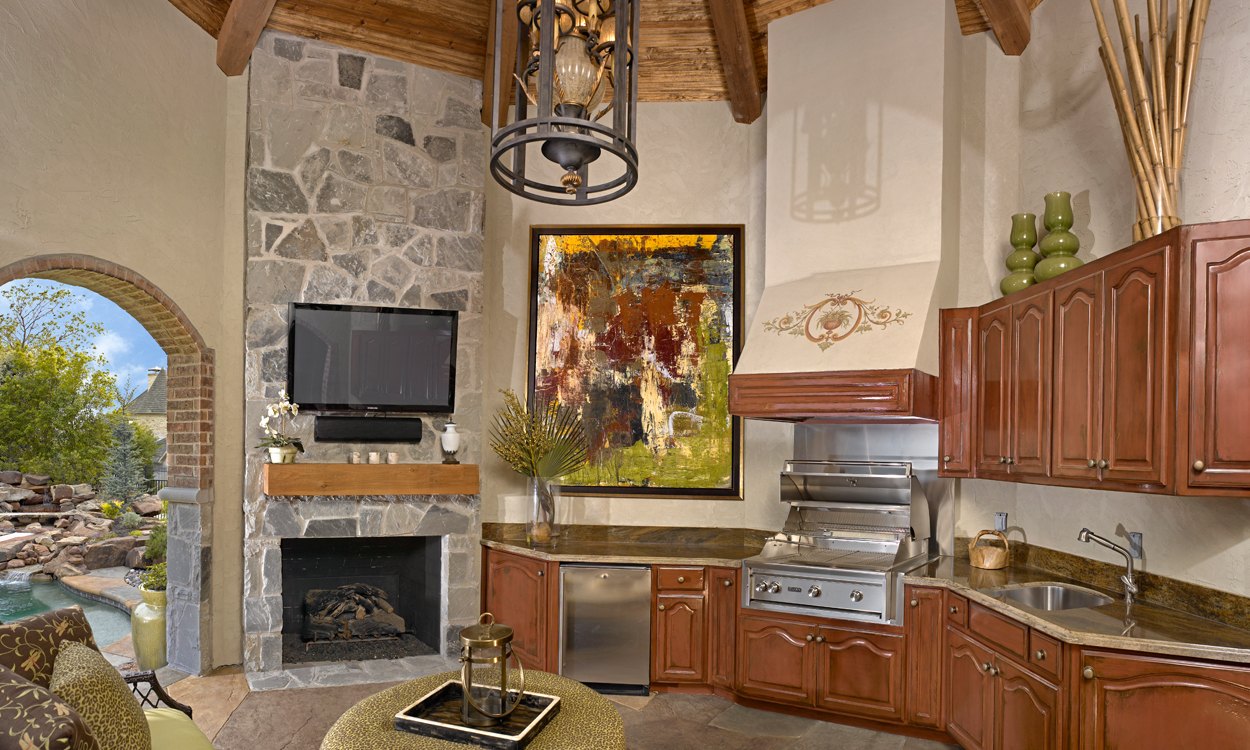
Bring Back Some Functionality

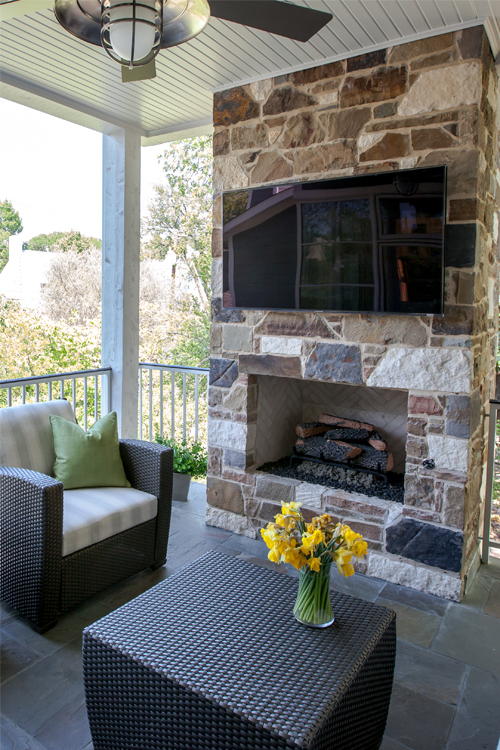
While functionality in terms of completing essential roles in the house is no longer necessary for fireplaces, that doesn’t mean it should be completely overlooked, especially when it comes to cooking. We’re not suggesting going back to the old days when all meals were cooked over an open fire, but cooking over an open flame can take some foods to the next level. Devoting enough space in your kitchen for a fireplace may not be a feasible option, but outdoor living presents a great way to incorporate a more functional fireplace. Plus it will help keep the excess smoke and mess outside where it will hopefully be easier to deal with.

Project Spotlight: New Pool Cabana is Outdoor Living at its Finest

Outdoor living and Texas are two things that tend to mix well together. With hot summers and mostly moderate winters, spending quality time outdoors is close to a no brainer for us Texans. From large grassy backyards, to refreshing swimming pools, to outdoor cooking equipment, or even just dedicated space to lounge around outside, there are a multitude of ways for homeowners to equip their house to enjoy the outdoors. The owners of this Dallas home decided to take advantage of several an maximize their home’s outdoor living capabilities. The project culminated in the remodel of the pool and backyard landscaping and the addition of a pool cabana that includes a fully equipped outdoor kitchen and ample entertainment space.

Before construction could begin, an old back house in the backyard needed to be removed. The enclosed back house was original to the property and featured a handful of rooms. But it was lacking in two ways. First, it did not match the main house and as such stuck out like an eyesore. The main house had been rebuilt several years prior and featured a sleek contemporary design. Compared to the main house, the old back house felt dated and shabby. Second, the enclosed nature of the back house meant that it wasn’t ideal for outdoor living purposes. With the back house taking up prime backyard location (right next to the pool, no less), it was decided that the best option was to tear down it and build the new pool cabana in its place.


The cabana and backyard concept was designed by Randy Angell (Randy Angell Designs) and reflects the contemporary design of the main house. It incorporates several elements that are common to contemporary design: clean lines, large and uncluttered open spaces, flat panel cabinetry, and minimalist décor with a few standout design features. Despite being built at separate times, it was important to the homeowners that the pool cabana felt like a natural inclusion and not a tacked-on afterthought. Great care was taken to match certain materials used on the cabana with the materials used to construct the main house. The brick and stone masonry used on the cabana are the same materials used on the main house and the colored concrete flooring is similar to rooms in the main house.

The outdoor kitchen area was designed to be a fully functioning unit. When in use, the homeowners did not want any back and forth between it and the main house. One way this goal is achieved is through the ample storage and countertop space that the kitchen provides. The cabinets and drawers were custom designed and offer enough storage space for essential kitchen items. Weatherstripping installed along the interior edges of the cabinets and drawers keep their contents safe from dust and dirt. The adjacent enclosed storage closet includes a pantry to store foods where they will be safe from environmental factors. The storage closet uses a mini-split unit for temperature regulation, a smart choice for smaller rooms that need temperature control but are not large enough to require a full HVAC unit. Cooking equipment in the kitchen include both a Big Green Egg and double side burner. The range hood has an extra-large depth to accommodate for the excessive amount of smoke that is generated by outdoor cooking appliances.

Adjacent to the kitchen area is a dining area with enough space to fit a large dining room table. The eclectic mixture of wood and metal for the table works well with the style of the cabana. There is enough space to comfortably fit ten of the bright green chairs, perfect for the homeowners to host large gatherings of family or friend. And if there still is not enough seating room then bar seating can be found along the half wall that frames a side of the kitchen. provides temperature control for the room.

To the other side of the kitchen is an entertainment and gathering area. It features ample space for several couches and lounge chairs and allows the homeowners plenty of room to lounge outside by themselves or comfortably host guests without feeling overcrowded in the space.  The linear fireplace is the focal point of the room. The fireplace hearth extends past the pool. It both provides additional seating around the pool and helps to tie the two spaces together. A flatscreen television overhangs the fireplace and provides even more of an excuse to get outside. Who wouldn’t enjoy a watching your favorite sports team play during an at home barbeque cookout? Furthermore, the cabana is designed to be comfortably used throughout the year. Infratech ceiling heater and two outdoor Haiku fans help make the cabana more comfortable in colder or warmer temperatures respectively. A built-in mosquito spray system was also installed throughout the cabana and backyard to keep bugs at bay.

Completing the cabana is an enclosed full-sized bathroom which allows the homeowners to clean up from swimming before returning inside. The bathroom features a custom built floating vanity with a quartz countertop and vessel sink that complement the overall contemporary modern design of the structure. The large walk in shower features a built-in soap niche, handheld and rain shower heads, and pebble tile flooring. The room features uniquely shaped green tile on the walls which adds unique style to the room.


Next to the cabana’s entertainment area is the pool. The pool itself underwent a few cosmetic changes during the project but most of the changes were to the surrounding area. Originally the pool was a relatively boring part of the backyard that brought little cosmetic value. An architectural water fountain feature was added along the backside of the pool where the extended fireplace hearth ends. To the other side of the foundation are three oversized built in planter pots. Jason Osterberger with Jason Osterberger Designs reworked the landscaping behind the pool and created a unique look that fits perfectly with the contemporary design of the home. Additional concrete pavers were added around the pool while others elsewhere in the yard were removed allowing for more uninterrupted green space in the yard.

2017 Winter Home Maintenance Guide

Winter is here! For some, you might already be experiencing the solder temperatures associated with this season. For others (like us) it may feel more like winter tomorrow rather than today. But regardless of whether how much it may, or may not, feel like winter outside, it's time for another list of tasks to get done around the house. Keep reading to find out more about some of the tasks we recommend adding to your to-do list this season.

Winterize Outdoor Plumbing

Below freezing temperatures do not mix well with outdoor plumbing. If you haven’t winterized your outdoor plumbing fixtures then this is the time to do it. Methods vary depending on the type of fixtures you have (hose hookup, sink, etc), so either jump online to research specifics for your equipment or put in a call to a professional who can do it for you instead. It is money well spent to avoid costlier damages.

Mix Up Your  Décor

When it comes to home décor, how often do you switch things up? For many people we bet the answer to that is not all that often, save of course for putting up holiday decorations throughout the year. Switching up home décor can help make your home feel fresh without having to make many changes. To avoid making too many new purchases try swapping current items between rooms. Tackle this task during your post-holiday clean up, that way your home won’t feel so bare after putting all the holiday décor away. The project pictured to the left was completed and photographed several years ago. Last year it was featured in Country Sampler's Prairie Style magazine with new photos. Between the time of the two photoshoots the homeowners made a few changes to the decor including swapping some pieces out completely and changing the location of others. Take a look at the magazine's photos here.

General Winter Maintenance Tasks

As with every season, there are a handful of general maintenance tasks around the house that are ideal to get done this time of year. It might seem redundant since we also recommended this in the fall, but clean out your gutters again once the trees are done losing all their leaves to prep for the wetter spring months. Visually inspect trees for dead or broken branches and get them removed before any bad winter weather hits. Inside the house clean out the duct lines behind the dryer and inspect the washer hoses for signs of deterioration. Finally, ensure that your fire extinguishers are up to date on their inspections. And if you don’t have at least one extinguisher in your home add it to your shopping list.

Enjoy Some Downtime

The start of the winter season can often be a very busy time. Between preparing for and celebrating holidays, hosting guests, kids home from school for a few weeks, perhaps a vacation, and anything else you have planned, it can be easy to get caught up with little time to just take a deep breath. Set aside some time for yourself to just refresh and relax in whatever way works best for you. This could mean finding a quiet corner where you can read a book, catching up on a television show or watching your favorite movie, or even closing the blinds in your bedroom one weekend morning so that you can sleep in.

Clean/Organize Your Kitchen

Save this task until after the holidays are over! The last thing you want while prepping a big meal is to have to remember the new place you stored that one spoon you desperately need. But once things have calmed down, plan time to restore some order to your kitchen and hopefully make your life easier. Go through all the drawers and cabinets to get a good handle on just what you have stored away. Be on the lookout for things that may have gotten lost behind other items, items that you don’t use anymore or that you own double, and group and for ways to better store things that will make them easier for you to find or use in the future. And if you find that some extra clean up and reorganization just isn’t enough, then that leads us to our next task…

Plan Kitchen Remodels

The winter holiday season tends to be a time when the kitchen gets pushed to its max. This greater amount of use in one of the most essential rooms in the house can make it easier to see what ways it is up to par and in what ways it falls short. Instead of spending another year trying to work within the limitations of your kitchen, take the time to figure out which changes would make the most impact and start planning a remodel. Once the holiday season is over start contacting contractors to get the project put into motion so that there will be enough time to get everything finished before the 2018 holiday season comes along.

Project Spotlight: Outdated Master Bath Receives a Much Needed Transformation

Outdated and incompatible with the needs of the older homeowners, the master bathroom in this Dallas home was in desperate need of a major update. The room featured many old fashioned details: carpeted flooring, an enclosed step into shower, and a partially built into the ground bathtub. The room itself was on a lower foundation and required stepping down into from the master bedroom in order to enter. While the homeowners were happy with the overall layout of their bathroom they knew that it needed a major upgrade both in function and design. They partnered with Pat Ratcliff of The Ratcliff Company to redesign the room. Once a new design had been created Key Residential was brought on board to bring the vision to life.

The first task in the remodel was solving the floor height difference between the bathroom and master bedroom. Stepping into and out of the bathroom was not a feasible and safe option for the homeowners. The best option was to raise the floor level in the bathroom to match the level of the bedroom (and the rest of the house). Additional concrete was added to the slab so that it would be flush with the adjacent master bedroom. Extra care was taken during the concrete pour process to ensure that the plumbing lines for the bathroom amenities would still be accessible after the additional concrete was added so that new fixtures could be installed reusing the original lines.


The homeowners did not want to change the general layout of their bathroom during the remodel, both because they were happy with the current setup and also as a way to help control the costs of the project. However they still wanted to replace their outdated bathroom amenities. So while updated and replaced, the main bathroom fixtures did not change location. Moving around plumbing or electrical is a quick way for any remodel budget to increase. By making minimal changes to these two items the homeowners were better able to control the cost of their remodel.

At the entry to the bathroom from the master bedroom is the dual sided his/her vanity. There are two doorways into the bathroom, one by each side of the vanity. The back to back dual vanity was a concept original to the pre-remodeled bathroom. However, some design and aesthetic changes were made to make it feel fresh and more in line with modern design trends such as new custom designed white cabinets and black countertops with undermounted sinks


A key change to the vanities was the mirror wall that separated the two sides. Originally a double-sided mirror hung via chains from a fir down in the ceiling. While it might have been a unique and desirable design when the house was first built, it now seemed strange and dated. The fir down was removed which helped give the room an even more open feel. A new thin wall was built for the mirrors to hang from. The large mirrors were framed with tram that matches other new trim installed throughout the room.


The walk-in shower was expanded and several changes were made to make it aging in place compliant and easier for the homeowners to use. Entry into the shower was changed to curbless, multiple grab bars were added, and a built-in shower bench was made. The inclusion of these features in no way detracts from the style and design of the shower, it is ADA compliant, stylish, and functional. The shower is completed with both a handheld and rain shower head and a custom built in soap niche. Long narrow windows along the outer wall of the shower allow for an influx of natural light without sacrificing the privacy expected in a shower. The frameless glass shower door and enclosure help contribute to an overall feeling of openness in the bathroom, a stark contrast from the enclosed feeling of the old shower.


A new freestanding tub replaced the old tub that was built into the ground. The new tub would be significantly easier for the homeowners to get in and out of.  The bathtub features a handheld shower wand for even easier use and is located next to three frosted glass windows that allow even more natural light to enter. The windows were not replaced in the remodel, another cost saving strategy. Green geometric wallpaper was used throughout the bathroom. Heated tile floors with a marble design were installed and match the tiles used in the remodeled shower. The heated floors extend throughout the bathroom and into both the toilet room and the walk-in closet.

Small Details that Make a Big Difference in Kitchen Design

Options abound when it comes to kitchen remodeling. And as one of the most used rooms in the house, having a well-designed and thought out kitchen can make your life significantly easier. But with all the available options it might be hard to know where to start. Figuring out the basics, like whether you want wood or painted cabinets, what material you want for your countertop and flooring, or what appliances you want to replace, can easily monopolize decision making efforts and cause you to miss out on some smaller details that can not only make your kitchen look better but also make it easier to use. Check out a few of these smaller detail ideas below.

The bottom row cabinets in this kitchen feature all drawers, making it easier for the homeowners to store their belongings without them getting lost behind other items.

The bottom row cabinets in this kitchen feature all drawers, making it easier for the homeowners to store their belongings without them getting lost behind other items.

Drawers Instead of Cabinets

One of the key functions of a kitchen is storage for the many items it contains. And with how much there is, it isn’t uncommon for things to get shoved inside cabinets and get lost behind other objects. One way to make your kitchen storage more effective is to add in more drawers for your lower cabinets. Large drawers can accommodate things like pots, pans, or other baking tools and makes them easier to pull out later. No more digging through cabinets. Just pull out the drawer, find what you need, and get to work.


These pull our spice drawers frame the oven and range unit. Their design makes it easy to store and then find specific spices.

Specialty Drawers and Cabinets

While we’re on the topic of cabinets and drawers, consider adding in a few specialty drawers to help make storage even easier. Spice and knife drawers are some of the most popular options. One option is to add narrow but tall drawers with multiple shelves that frame a built-in oven or range for spice storage. These drawers help keep your spices organized and easy to find. Specialty cabinets can also be quite helpful in storing smaller appliances that normally take up space on the countertop and can be an eye sore. Another very popular trend is to build in trash and recycling drawers that make them easy to access but safely out of sight.


This area previously served as a breakfast room but was turned into a morning room where the homeowners can comfortably enjoy their breakfast and coffee while watching the news.

Turn the Breakfast Room into a Sitting Room

Many homes come equipped with both a breakfast room/eating area connected to the kitchen and a separate formal dining room. But how often do both rooms see significant use? Or how often are meals spent eating on the couch in front of the TV? Why not convert the breakfast room space into something more useable? If you have school aged children this might mean creating a better equipped work station for them. Or you could just fully embrace the TV watching by adding in comfortable chairs and a television. The proximity means it’ll be easier to return dirty plates to the kitchen or grab more food if you’re still hungry.


The refrigerator features front panels designed to match the adjacent cabinetry. The dishwasher, mostly obscured by the island, also features a custom panel front.

Cabinet Fronts for Appliances

If you are looking for a cohesive and clean look in the kitchen then consider using special panel fronts for your appliances that match your cabinets. Appliances like refrigerators, freezers, and dishwashers tend to be the best options for custom panel fronts. This simple change can elevate your kitchen and give it a very sophisticated look. Many appliances come with a panel ready option. Just be careful to keep track of which cabinets are truly cabinets and which are appliances.


The upper row glass front cabinets in this kitchen allow the homeowners to artfully display some of their special china dishware.

Glass Front Cabinets

This feature will require a bit more upkeep and organization inside your cabinets, but regardless of any added work associated with them, glass front cabinets are an increasingly popular trend in the kitchen. Their see-through fronts allow these cabinets to serve the role of both storage and décor. You don’t need to have any standout dishware to display in order to justify glass front cabinets. Well organized stacks of plates or neatly arranged glasses can look just as good.


A farmhouse sink is right at home in this rustic country styled kitchen.

Farmhouse Sink

The farmhouse sink has become one of the most popular staples in a kitchen. The large oversized bowl makes it ideal for cleanup as it can more easily accommodate larger items. If you’re unwilling to part with a double sink then a double apron sink is an option, but it will come at the expense of the large bowl. Apron sinks will overhang the cabinets slightly so make sure to pick a sink in a finish that will match your kitchen’s style. Luckily, you’ll have plenty of options to choose from.


The color, shape, and mosaic nature of this tile backsplash make it a standout feature in this outdoor kitchen.

Backsplash Feature

A kitchen cannot be complete without a backsplash. However, instead of using just a standard tile backsplash why not use the backsplash to bring in some extra design and appeal? One way to do this is to use a uniquely shaped tile or by laying a standard shaped tile in an interesting. Choosing a standout color can also add interest. Specific sections of the backsplash, such as above the range, can also be used for a special built in tile feature. Don’t settle for a standard backsplash, find some way to make it stand out that works for your design aesthetic and needs.