Project Spotlight: Modern Convenience in a Historic Home

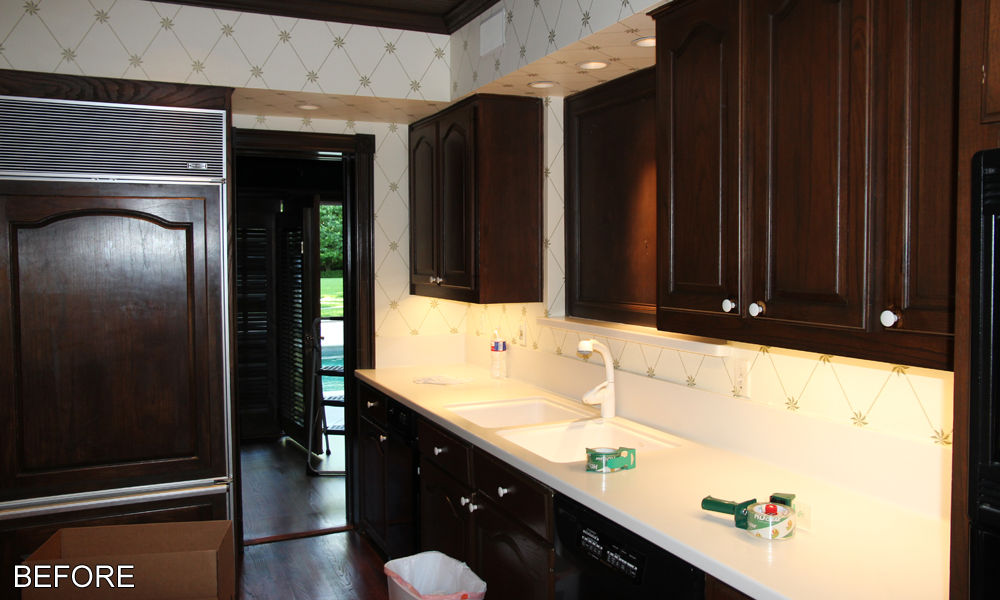
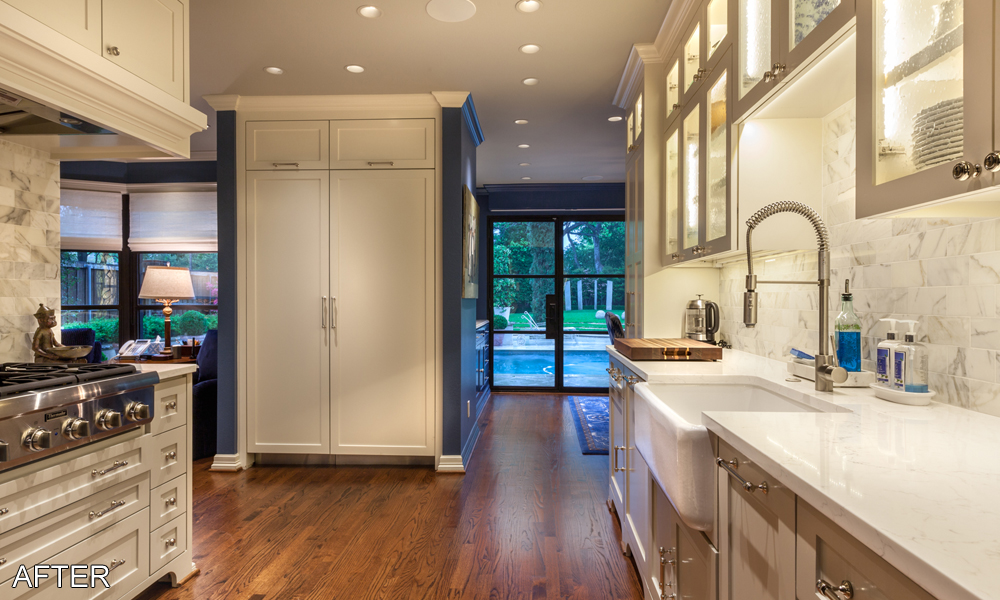
Over the past two months our blog has featured an in depth look at the kitchen and living room portion of the remodel of this historic Dallas home. In our latest blog post it’s time to take a closer look at another major portion of the project: an elevator addition. The homeowners loved their home and wanted to be able to age in place. As such, their home needed to be equipped to handle any changing needs they might have in the future. Because they were already engaged with the large-scale remodel of other areas of the home, they decided that this was the perfect time to tackle the addition of an elevator to help make their future, and current, lives easier.


Adding an elevator onto a home tastefully can be tricky. In most cases, including this project, there is not enough space in the existing home for an elevator so that space has to be added on. But all too often these elevator shaft additions can stick out like a sore thumb. In many cases the elevator shaft addition is just a rectangular tower tacked on to an exterior wall of the house. The homeowners greatly valued the Tudor style and design of their home and did not want to sacrifice those elements for the sake adding an elevator. They wanted the elevator addition to seem like it had always been an intentional part of the home.


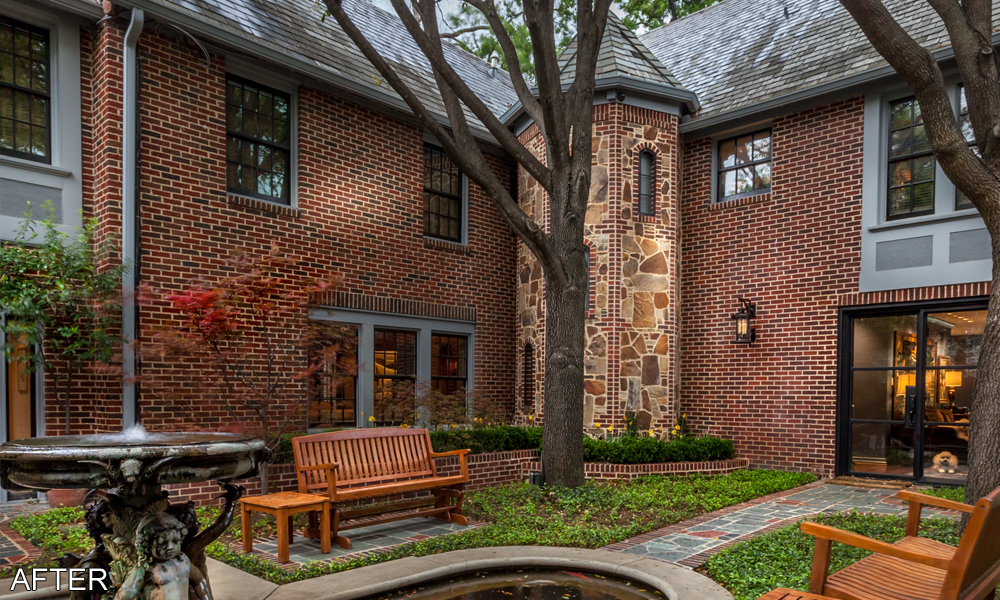
To accommodate the homeowners’ desires, careful thought was put into the design of the elevator shaft. Architecturally, the elevator shaft was designed to mimic the look of a European castle turret. The three niches within the exterior of the shaft resemble windows and their ascending placement around the shaft gives the structure an appearance of housing something like a rounded staircase. But the niches are not actually windows. They were made using a slate background and a steel grid that matches the new windows in the living room and kitchen to closely mimic the look of a window. To further aid in ensuring that the elevator shaft blends in with the design of the home’s existing exterior, the brick and stone masonry material was carefully matched with material originally used on the home when it was first built.


Some of the landscaping in the courtyard had to be reworked to accommodate the new elevator addition. The walking path was rearranged as it used to lead to an exterior entry door where the elevator shaft was added. New built in flower beds were added around the shaft that tie in with the existing flower beds. Again, the brick and stone masonry that was used match original materials used to construct the house to create a seamless transition between the old and new parts. If someone were to walk through the courtyard they would never know that the tower-esque structure had not been built along with the original house.


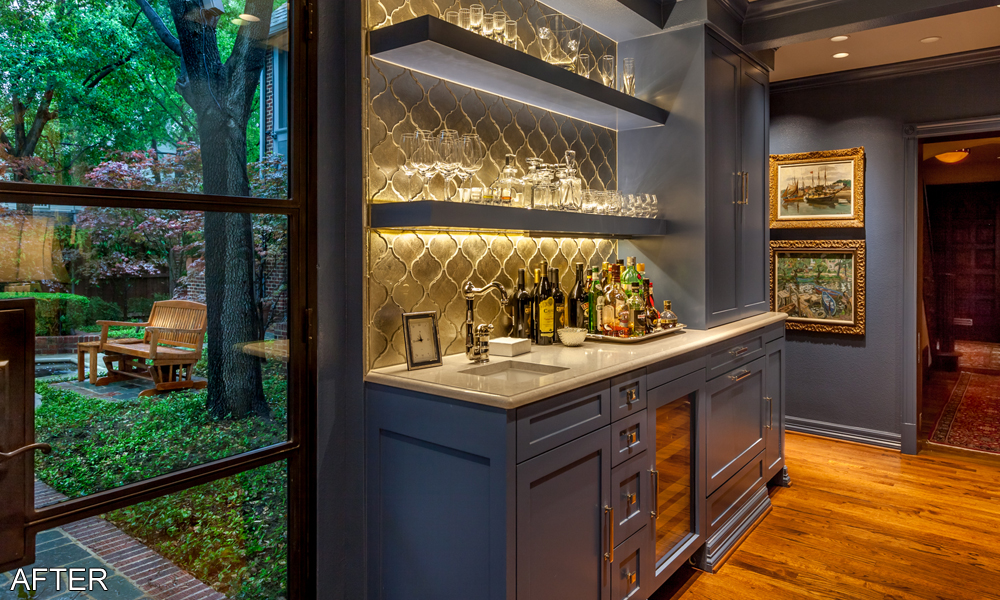
The interior of the elevator is paneled with dark stained wood that matches wood wall paneling on the second-floor landing. The brass finishing of the elevator mechanics gives it a classy and high end finish. On the first floor the elevator entrance can be found on the far side of the remodeled bar. Its close proximity to the kitchen and living room allows for added convenience of use in the large house. On the second floor the elevator opens to a hallway that leads to the master suite. Placing the elevator in this location allows for the best possible access to the areas of the house most used by the homeowners.

2018 Spring Home Maintenance Guide

Another winter has come and gone and today we mark the official return of spring. As you prepare to say goodbye to the cold and welcome back the warmer weather, it’s also time to knock out a new list of tasks to keep your house in good working order. Keep reading for a few ideas of what we recommend adding to your to do list over the next few months.


Spring Cleaning

It seems only right that we start with this quintessential and often dreaded task. A refreshed, uncluttered, and cleaned up home is a great way to welcome in the new season. Play to your strengths as you approach this task. If you prefer powering through something until it’s complete, then set aside a weekend and make spring cleaning your top priority. If you’re better working in small chunks, then make a schedule with specific goals that you can accomplish throughout the season. It may be a chore, but you’ll appreciate the effort once it’s done.

Clean Windows

Longer and sunnier days are on their way! Don’t let dirty windows stop you from enjoying them. Take some time to do a thorough cleaning. Wash both the inside and outside of the panes as well as the indoor sills and surrounding trim. Also, visually inspect the caulking and sealing around your windows for deterioration or leaks. Fix any issues that you find now to help keep the cooler air in come summer by taking time to maintain your windows now.


Prep Outdoor Living Areas

The shift towards more pleasant weather means increased opportunities to get outside and enjoy the fresh air. While the cold of winter may still linger for a few more weeks, this is an ideal time to begin preparing your outdoor living space. Get furniture out of storage, dewinterize outdoor plumbing (once there are no more freezes), and make sure your outdoor appliances and equipment are in good working order. If anything needs to be replaced or added get it now before the summer rush at stores.

Deep Clean Floors

Winter weather can wreck havoc on your floors with all the dirt and muck that gets tracked in. Give your floors a fresh start this spring by giving them a good deep cleaning. Some floor cleaning can be DIY-ed without bringing in a professional, but we recommend researching best practices for your floors before starting to avoid inadvertently harming them. Give extra attention to entryways and mudrooms as they see the most traffic coming in from the outdoors.

General Home Maintenance Tasks

Once again, when a new season starts there are a few general home maintenance tasks to add to your to-do list. First,  clean out and make any necessary repairs to your gutters so that they are ready to handle the spring rain deluge. While you’re outside start prepping your gardens. Clear out weeds, lay new mulch, and do any other necessary prep so that when planting time arrives everything is ready. Another task to complete is to test run your air conditioning unit. The temperature outside might not be warm enough to warrant turning the A/C back on full time, but if there are any issues with the unit then you’ll want to get them fixed now and not be left without access to cool air when the summer heat hits,


Inspect Roof

Spring tends to bring with it some of the wettest weather of the year and the last thing anyone wants during an intense rainstorm is to find out that their roof is bad. Unexpected leaks or hidden damages that have festered over time often require immediate attention when they are discovered. To help prevent that unfavorable scenario, take time now to inspect your roof. At the very least do a visual inspection for glaring issues. If your roof is older or if you have any reason to suspect that it has sustained damage then it would be wise to bring in a professional to do a closer inspection. You may also want to consider this option if it has been a while since your roof’s last professional inspection.

Inspect Attic

Spring’s moderate temperatures make it an ideal time to knock out a few tasks in the attic. Inspect for signs of unwanted critters or insects who may have made your attic their home. These pests can cause significant damage if not taken care of promptly. Also look around for signs of mold. Conditions in the attic provide good breeding grounds for mold growth. Finally, take stock of everything you have stored up there. Get rid of itemsyou don’t need and spend some time organizing what you want to keep so that when you need something it is easy to find.

Take a Home Tour

When it comes to planning home remodels the internet is a good source of inspiration. But nothing beats getting to see things in person instead of on a screen. A great way to do that is by going on a local home tour. If you live in a growing area search out new construction sites with model or show homes. Open houses are another option, although you won’t be assured that you’re seeing the latest and greatest in home design. But homes on the market want to attract buyers so hopefully they will have undergone some updates to make them appealing. One of the best parts of touring local homes is that you’ll get the chance to see designs that are popular in your area. If trying to ensure the highest return on investment is an important factor in your remodeling plans then you’ll want to ensure you’re sticking to popular local trends.

Project Spotlight: Upgraded Living Room in a Historic Dallas Home

Cover Photo.jpg

Last month we featured the kitchen remodel of this home on our blog. If you haven’t read it, we would recommend checking it out, or at least look through the photos to see the incredible transformation. But the remodel work at this home was not limited to the kitchen. This month we wanted to focus on the remodel of the living area as we continue this behind the scenes look at the remodel of this historic Dallas home. The remodeled living room was part of an effort to create a more open and inviting general living area that both incorporated modern amenities and honored the home’s heritage.  Once again working with designer Mark Fletcher of Deleo & Fletcher Designs, the homeowners created a living room where they could relax in comfort and style.


As with the kitchen, the main footprint and layout of the living room did not change in the course of the remodel, but the room did receive a complete update throughout . Due to adjusting a few of the walls, adding larger windows, and some necessary rewiring, the space had to be gutted down to the studs during the remodel. The open-door frames that led to the former garden room and to the bar were removed to promote a better sense of openness between the connected rooms. Constructing a truly open living space between the living room and kitchen areas was not practical with the project, but the increased connectivity between the rooms creates as close to an open living space as possible.


The focal point of the remodeled living room is the fireplace. A new custom designed limetone surround with matching mantle and hearth replaced the old dated brick surround and hearth. The new limestone surround has a very traditional design to it that is right at home within the overall design style of the home. The wall tile that spans the distance between the fireplace and adjacent bookshelves and between the mantle and the ceiling blends well with the limestone and helps make the fireplace appear even larger. The TV above the fireplace is hung on a pull-down wall mount that allows the homeowners to lower the TV to an easier viewing height when in use.


To either side of the fireplace are new built in cabinets and bookshelves. The undershelf lighting help to highlight the art pieces and décor that are displayed on them. As avid art collectors, the homeowners wanted to ensure that their collection could be properly displayed throughout the home. Special care was taken with the lighting placement throughout the living room to make sure pieces were properly highlighted. The cabinets and shelves were painted the same blue as the wall color to form a cohesive look. The white tongue and groove backing behind the shelves provides a break in the dark color and helps the bookshelves stand out.


Connecting the living room and the kitchen is a wet bar. The original bar area, like the other rooms, was very dark and had dated décor. The mirror wall, in particular, had a very 80’s vibe to it. The bar cabinets were replaced with new custom designed cabinets that match the design of the cabinets in the kitchen and were painted to match the blue color of the walls. The mirror wall was replaced with a metallic arabesque shaped tile backsplash. Paired with the undershelf LED lighting, the tile creates a unique design element. Included in the wet bar is an undercounter beverage fridge, and panel front fridge drawer and nugget ice machine.

The bar area also includes the first-floor entrance to the elevator addition (which we’ll take a closer look at in an upcoming blog post) and a pocket doggy door. As owners  of several small dogs, the homeowners wanted a way to coral their pups when needed but they didn’t want it to take away from the high-end style of the home. The solution was the pocket doggy door that was custom built to match the design style of the home. It features leaded glass and dark stained wood that matches the wood door frame.


New floor to ceiling steel framed windows with matching doors that lead to the courtyard and backyard replaced the old small wood clad windows. The new windows allow for a plethora of natural light throughout the area as well as beautiful views to the well landscaped outdoor areas. As with the breakfast room, Lutron controlled shutters provide privacy when needed but without feeling bulky like the wood plantation shutters that covered the old windows.


Stylish and classy, the remodeled living room both honors the history of the home and provides the homeowners with modern comforts and amenities. The room feels high-end but also inviting and is the perfect place for the homeowners to relax by themselves or host family and friends. But let’s face it, it’s really the homeowners’ two adorable dogs that will enjoy the new digs the most.

4 Questions to Ask Yourself Before Starting an Outdoor Living Remodel

As the end of February approaches, we’re well into the doldrums of winter. The cold weather and shorter days have been around long enough to be more tiresome than a relief from last summer’s heat (at least for those of us who prefer the warmer weather to cold). There’s still some time to go before spring and summer get here, but this is the perfect time to start making plans to capitalize on one of the best ways to spend those warm summer days: outdoor living. But before you start making those plans we recommend asking, and answering, these four questions to ensure that you can create an outdoor living space that best fits your wants and needs.

How do you plan to use your outdoor living space?

These homeowners wanted to create an entire outdoor oasis. This pool house cabana features a large outdoor kitchen, dining area, entertainment area, and enclosed pool bath. Its proximity to the pool makes it easy to use both areas without feeling much of a separation between the two key outdoor living features.

This is probably the most important question you need to ask yourself as you approach an outdoor living remodel. The answer is going to guide you not just through the rest of these questions but also through the rest of the entire remodel process. Outdoor living can encompass a wide variety of things. It could be something as simple as a covered porch that is ideal for a few pieces of lounge furniture where you can relax and enjoy the fresh air. Or it could be more complex like a full-size pool house complete with an outdoor kitchen, entertainment and lounging areas, a pool bath, and of course the pool. And then there’s everything else in between. How you want to use your outdoor space will determine just where you fall on the simple to complex scale. If you just want a place where you can enjoy a good book while sipping on some lemonade then you’re not going to need something as substantial as the person who loves to cook and wants to host a bunch of summer parties where they can bust out their skills for their family and friends. Define your goals and approach every decision with them in mind.


How much space do you want to devote to outdoor living?

With a small backyard, the homeowners knew they were limited in space for outdoor living. But they made the space between two wings of the house work for a small patio that includes room for quite a bit of seating as well as a built in fire pit.

Your answer to the previous question will likely play a factor in the answer for this one. The amount of type of amenities that you want to include within your outdoor living space will play a key role in how much space you will need to devote to them. But you should make sure you have realistic expectations of what can be achieved with the space that you have. The size of an outdoor living project can vary greatly. For example, an outdoor kitchen could be as small as a built-in grill with some cabinets and countertop space or it could be large enough to fit multiple cooking appliances, an outdoor refrigerator, clean up station, and even a full-sized dining table. How you answer this question will also likely be determined, at least in part, by the amount of space that is available. But good news, you don’t need to have a giant backyard to be able to take advantage of outdoor living! Even within a small backyard there is likely still space for a petit covered patio or small grilling station. Brining in a professional designer could be a big help in maximizing your space, regardless of whether it is small or large.


What is already there that is worth keeping and working with?

This home already had a small covered patio with space for a built in grill and some seating. The homeowners decided to expand the covered porch and extend it towards the pool so that it would be large enough for a full size outdoor kitchen, a large dining area, and a separate entertainment area.

Working with what you already have can save both time and money. That doesn’t mean you have to keep everything, but it may serve as a good starting point in creating your ideal outdoor living space. An already existing covered patio could be expanded and remodeled to fit a large outdoor kitchen and entertainment area. Or perhaps that patio would become your ideal outdoor living area with the addition of a few simpler things like special lighting, built ins, or just a general makeover. Another item you may want to consider working with is an already existing pool. Pools, especially in Texas, can be a big part of an outdoor living area. In the heat of the summer there is nothing better than cooling off within the comfort of your own backyard. Adding new outdoor living fixtures within close proximity of the pool would be a great way to tie the spaces together and create easier back and forth.  


What is your investment amount?

The homeowners strategically chose to open up the third car bay in their garage to create a small covered outdoor patio. While not as extensive as some of our other outdoor living projects, the homeowners invested their budget in creating the specific French country house design that was important to them.

When it comes to home remodeling projects it is essential to have a set budget amount before any work begins. That holds even more true when the project falls more into the want column instead of a need. Ideally, you should have a close to definite number in mind before even contacting any professionals about doing the work. Why? Because it is all too easy to get lost in the excitement of creating plans and end up in over your head in how much it will cost. You need to know how much you want to spend so that you can make the necessary decisions in the planning phases of the project instead of being led down a rabbit hole of wishes and dreams that can only turn into disappointments when they can’t fit within your budget. When you know the budget that you are working with then the professionals that you bring on board will be better able to assist you in spending your money in the best way possible. And make sure that you set aside part of your budget as a contingency fund. Even with the best laid plans things will go wrong and unexpected costs will happen. Plan for it in advance so that it won’t be a major crisis when those things inevitably happen.

Project Spotlight: Luxe Remodel Brings New Life to Kitchen

As one of the most important and most used rooms in the home, a well-functioning kitchen is essential to a well-functioning home. And while not quite as essential, style and design can also make an immense difference in whether the kitchen is a place that is loved or dreaded. With over twenty years since its last remodel, the kitchen of this Dallas home lacked in both functionality and design. The homeowners partnered with Mark Fletcher of Deleo & Fletcher Designs to design a high-end kitchen that both honored the home’s history and traditional design while also incorporating modern amenities and luxuries. Key Residential was brought onboard to bring the design to life.


Before the remodel, the kitchen had a very dark and enclosed feel. The dark stained wood of the cabinets, the fir downs, and the narrow door frames only exacerbated the cramped feel. Creating a room that was more open and felt larger was a key goal of the homeowners. Furthermore, they wanted the room better connect with the adjacent living areas. Without many options to truly expand the room, the homeowners made strategic design decisions to maximize the space and give it that larger feel that they desired.


For starters, the homeowners did find a way to claim more actual square footage for the kitchen: by expanding it into adjacent rooms. The small breakfast room off the kitchen was the easiest space to connect. Removing the narrow open-door frame that separated the two areas increased connectivity and made the breakfast room feel like a natural continuation of the kitchen.


A smaller room, the homeowners decided that converting the breakfast room into a morning room would be a better use of the space. Buffet cabinets were added along one wall and frame a wall mounted TV. Two comfortable recliners were added, providing a space where the homeowners can relax in the morning with a cup of coffee while catching up on the news. Completing the renovations in the morning room are new larger windows that allow an influx of natural light into the room, a proven design trick for making a room feel larger.


But now a new location needed to be found for the breakfast room. Luckily there was an easy solution. Adjacent to the kitchen, but again separated by a narrow open-door frame, was a garden room. With ample general living space in the nearby living room, commandeering the garden room for use by the kitchen would not be an issue. Plus, with a growing extended family, a larger breakfast room would provide the homeowners with a more intimate and low-key setting to host family meals together.


As with the morning room, the door frame that separated the new breakfast room from the kitchen was removed.  Matching buffet cabinets, albeit in a different color, were added along a wall of the room. The quartz countertop and backsplash and the leaded glass fronts for the upper row cabinets give them a luxurious appearance. The area is spacious enough to fit a large dining table without feeling cramped and new floor to ceiling steel framed windows provide a beautiful view of the backyard. But if the homeowners need privacy then the Lutron controlled shutters can easily be brought down to obscure the view.


Within the original kitchen space new cabinets that follow a similar footprint as the old cabinets were added and match those added in the morning and breakfast rooms. Removing the imposing fir downs allowed the new cabinets to extend to the ceiling. The white color of the cabinets helps to create a lighter and more open feel in the room. The cabinets feature a recessed panel design with feet to mimic the look of furniture, details that fit well within the traditional design scheme of the house. The upper level cabinets feature glass fronts so that the homeowners can display their more artistic dining pieces. While this cuts down on available storage space in the kitchen it is made up for by the additional cabinets in the morning and breakfast rooms. Ample storage space is one thing the homeowners will hopefully not need to worry about in their remodeled kitchen.


New top of the line appliances were added including a 6 burner gas range top, panel ready refrigerator and freezer, microwave drawer, and trash compactor, to name a few. The light-color of the quartz countertop and quartz tile backsplashes was a strategic choice to help make the room feel open and light. The darker blue color of the walls might create an imposing feel but the use of lighter colors throughout the room and the general lack of open wall space to feature the blue color help mitigate the risk. Under cabinet task lighting s additional lighting to help chase away any lingering feelings of darkness.